2013-05-13 110 views
3

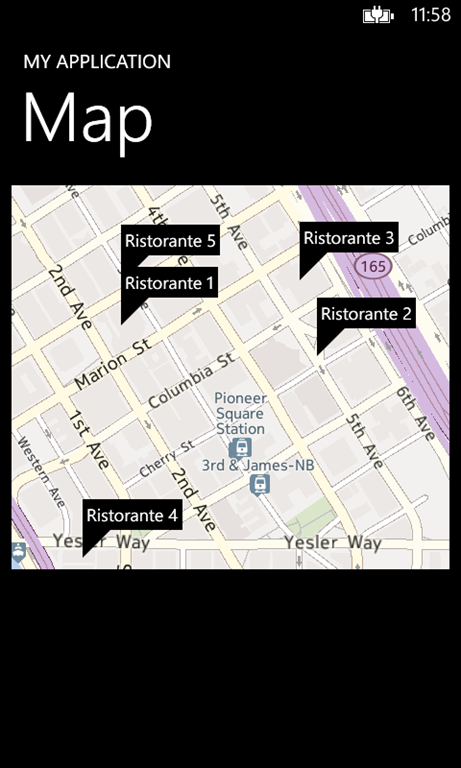
默认情况下,它们看起来像这样:http://wp.qmatteoq.com/wp-content/uploads/2013/01/map.png。我想让他们看起来像在诺基亚地图上,像这样:http://www.themobileindian.com/images/nnews/2012/11/9225/Nokia-Maps.jpg,所以他们占用更少的空间。每次点击它们时,它们都会在图标和说明之间切换。Windows Phone 8诺基亚地图:如何更改Microsoft.Phone.Maps.Toolkit图钉的设计?

可以说我有在资源图钉两个模板:

<ControlTemplate x:Key="1" TargetType="maptk:Pushpin"> 
     <Grid x:Name="ContentGrid" Background="Transparent" Margin="-4,0,0,0"> 
      <StackPanel > 
       <Grid Background="Black"> 
        <StackPanel Margin="5,5,0,0"> 
         <i:Interaction.Triggers> 
          <i:EventTrigger EventName="Tap"> 
           <cmd:EventToCommand PassEventArgsToCommand="False" 
                CommandParameter="{Binding}" 
                Command="{Binding ElementName=NearbyMap, Path=DataContext.Pushpin_OnTapCommand}"/> 
          </i:EventTrigger> 
         </i:Interaction.Triggers> 
         <TextBlock Text="{Binding Location}" Foreground="White" /> 
         <StackPanel Orientation="Horizontal"> 
          <TextBlock Text="{Binding LocationName}" Foreground="White" /> 
          <TextBlock Text="-" Foreground="White" Padding="3,0"/> 
          <TextBlock Text="{Binding LocationName}" Foreground="White" /> 
         </StackPanel> 
         <TextBlock Text="{Binding LocationName}" Foreground="White" /> 
         <TextBlock Text="{Binding LocationName}" Foreground="White" /> 

        </StackPanel> 
       </Grid> 
       <Polygon Fill="Black" Points="0,0 29,0 0,29" Width="29" Height="29" HorizontalAlignment="Left" /> 
       <Grid Height="26" Width="26" Margin="-13,-13,0,0" RenderTransformOrigin="0.5,0.5" HorizontalAlignment="Left"> 
        <Grid.RenderTransform> 
         <CompositeTransform Rotation="-45"/> 
        </Grid.RenderTransform> 
        <Rectangle Fill="Black" HorizontalAlignment="Center" Margin="0" Stroke="White" VerticalAlignment="Center" Height="26" Width="26" /> 
        <Ellipse HorizontalAlignment="Center" Height="16" Margin="0" VerticalAlignment="Center" Fill="Green" Width="16" /> 
       </Grid> 
      </StackPanel> 
     </Grid> 
    </ControlTemplate> 

    <ControlTemplate TargetType="maptk:Pushpin" x:Key="2"> 
     <Grid Height="26" Width="26" Margin="-13,-13,0,0" RenderTransformOrigin="0.5,0.5" > 
      <Grid.RenderTransform> 
       <CompositeTransform Rotation="-45"/> 
      </Grid.RenderTransform> 
      <Rectangle Fill="Black" HorizontalAlignment="Center" Margin="0" Stroke="White" VerticalAlignment="Center" Height="26" Width="26"/> 
      <Ellipse HorizontalAlignment="Center" Height="16" Margin="0" VerticalAlignment="Center" Fill="Red" Width="16"/> 
     </Grid> 
    </ControlTemplate> 

和图钉控制:

<maptk:Pushpin x:Name="PushPins" GeoCoordinate="{Binding Location}" Visibility="Visible" Content="{Binding LocationName}" Template="{StaticResource 2}"/> 

我如何在它们之间有一定的触发或东西切换?

+0

你有没有想出一个很好的解决方案呢?寻找一个我自己的... – Depechie 2013-05-22 13:18:33

回答

0

您可以使用一般技巧来修改TK组件的外观。这可以用于几乎所有的传统知识组件。

所有TK组件都有样式(在XAML中定义),它们不能通过代码设置。但你可以覆盖你的应用程序中的样式(请记住,你一般会覆盖样式,所以如果你修改了图钉样式,你应用程序中的所有图钉将看起来像这样)

更详细一些:

一)获取从https://phone.codeplex.com/sourcecontrol/latest

b中的TK源)看一看为主题/ Generic.xaml

C)旁边的最后一个元素,您将看到图钉的样式定义。 始于:

<!-- Default Style used for Pushpin --> 
    <Style TargetType="maptk:Pushpin"> 
... 

d)复制这种风格(或者你可以从课程的从头开始编写),并修改为任何你喜欢的

E)添加这个修改后的代码片段到你的应用程序的风格。资源(例如App.xaml中的Application.Resources部分)

请记住,您还需要引用正确的TK名称空间。 对于图钉,你需要包括:

xmlns:maptk="clr-namespace:Microsoft.Phone.Maps.Toolkit" 

现在您的应用程序使用本地被覆盖的风格图钉。

Btw:由于TK是Ms-PL许可的,请记住,如果您从MSFT获取原始源代码,可能会有许可限制。

+0

这不完全是我要找的。这些推针看起来像这样http://wp.qmatteoq.com/wp-content/uploads/2013/01/map.png和我正在寻找的是他们之间的切换。不管怎么说,还是要谢谢你。 – 2013-05-14 11:23:35

+0

复制样式时,图钉看起来完全一样。真正。但是你可以随意修改它,只要你喜欢,例如你可以改变它的样式,使它们看起来像第二张图片。诺基亚图钉(作为风格)不属于该工具包的一部分(它们由诺基亚制造)。 – Marco 2013-05-14 12:36:37

+0

是的,我知道我可以改变他们的风格,但那不是我想要的。我想在Tap事件中切换它们。 – 2013-05-14 12:42:24

0

我个人发现不使用该工具包的图钉更容易。相反,我写了一个用户控件“PushPinUC”,我设计了我想要的。 UserControl订阅Tap事件 - 所以我可以在按下时展开/收回。

您可以使用以下代码将用户控件添加到您的Map控件。

private void BindPushpins(IEnumerable<PushpinIVM> pushpins) 
{   
    foreach (var pushpin in pushpins) 
    { 
     var pushPinUC = new PushpinUC { Pushpin = pushpin }; 
     var mapOverlay = new MapOverlay { GeoCoordinate = pushpin.Location, Content = pushPinUC }; 
     var mapLayer = new MapLayer { mapOverlay }; 
     Map.Layers.Add(mapLayer); 
    }       
} 
0

我发现了一个解决方案:只添加一个控件模板到图钉上。在stackpanel是没有文本框的图钉之前,stackpanel是带有文本框和网格的图钉。堆叠面板的可见性折叠。正如你所看到的那样,触发事件有两个触发器,我只是将图钉的可见性设置为可见或折叠。您可以使用任何图像的图钉。

<ctrls:BaseUserControl.Resources> 
    <ControlTemplate x:Key="PushPinTemplate" TargetType="maptk:Pushpin"> 
     <Grid x:Name="ContentGrid" Background="Transparent" Margin="-4,0,0,0"> 
      <Grid Height="40" Width="30" Margin="-13,-13,0,0" RenderTransformOrigin="0.5,0.5" > 
       <Image Source="/Assets/Images/push1.png" Width="40" Height="40"> 
        <i:Interaction.Triggers> 
         <i:EventTrigger EventName="Tap"> 
          <cmd:EventToCommand PassEventArgsToCommand="True" 
                Command="{Binding ElementName=NearbyMap, Path=DataContext.Rectangle_OnTapCommand}"/> 
         </i:EventTrigger> 
        </i:Interaction.Triggers> 
       </Image> 
      </Grid> 
      <StackPanel x:Name="DetailsPanel" Visibility="{Binding Path=Visibility}"> 
       <Grid x:Name="TestGrid" Background="Black"> 
        <StackPanel Margin="5,5,0,0"> 
         <!--TextBlock tap--> 
         <i:Interaction.Triggers> 
          <i:EventTrigger EventName="Tap"> 
           <cmd:EventToCommand PassEventArgsToCommand="True"              
                Command="{Binding ElementName=NearbyMap, Path=DataContext.Pushpin_OnTapCommand}"/> 
          </i:EventTrigger> 
         </i:Interaction.Triggers> 
         <TextBlock Text="{Binding LocationName}" Foreground="White" FontSize="25"/> 
         <StackPanel Orientation="Horizontal"> 
          <TextBlock Text="{Binding StreetName}" Foreground="White" /> 
          <TextBlock Text="{Binding StreetNumber}" Foreground="White" /> 
         </StackPanel> 
         <StackPanel Orientation="Horizontal"> 
          <TextBlock Text="{Binding DistanceToDisplay}" Foreground="White" /> 
         </StackPanel> 

        </StackPanel> 
       </Grid> 
       <Polygon Fill="Black" Points="0,0 29,0 0,29" Width="29" Height="29" HorizontalAlignment="Left" Visibility="Visible"/> 
       <Grid Height="40" Width="30" Margin="-13,-13,0,0" RenderTransformOrigin="0.5,0.5" HorizontalAlignment="Left"> 
        <Image Source="/Assets/Images/push2.png" Width="40" Height="40"> 
         <i:Interaction.Triggers> 
          <i:EventTrigger EventName="Tap"> 
           <cmd:EventToCommand PassEventArgsToCommand="True" 
                Command="{Binding ElementName=NearbyMap, Path=DataContext.Rectangle_OnTapCommand}"/> 
          </i:EventTrigger> 
         </i:Interaction.Triggers> 
        </Image> 
       </Grid> 
      </StackPanel> 
     </Grid> 
    </ControlTemplate> 
</ctrls:BaseUserControl.Resources> 

<Grid x:Name="ContentPanel" Grid.Row="1" Margin="12,0,12,0"> 
    <maps:Map x:Name="NearbyMap" 
        Center="{Binding MapCenter, Mode=TwoWay}" 
        ZoomLevel="15" 
        dp:MapPushPinDependency.ItemsSource="{Binding Path=Locations, Mode=OneWay}" 
       > 
     <i:Interaction.Triggers> 
      <i:EventTrigger EventName="Tap"> 
       <cmd:EventToCommand PassEventArgsToCommand="True" 
            Command="{Binding ElementName=NearbyMap, Path=DataContext.Map_OnTapCommand}"/> 

      </i:EventTrigger> 
     </i:Interaction.Triggers> 
     <maptk:MapExtensions.Children> 
      <maptk:MapItemsControl Name="StoresMapItemsControl"> 
       <maptk:MapItemsControl.ItemTemplate> 
        <DataTemplate> 
         <maptk:Pushpin x:Name="PushPins" GeoCoordinate="{Binding Location}" Visibility="Visible" Content="{Binding LocationName}" Template="{StaticResource PushPinTemplate}"/> 
        </DataTemplate> 
       </maptk:MapItemsControl.ItemTemplate>    
      </maptk:MapItemsControl> 
      <maptk:UserLocationMarker x:Name="UserLocationMarker" Visibility="Visible" GeoCoordinate="{Binding MyLocation}"/> 
     </maptk:MapExtensions.Children> 
    </maps:Map> 
</Grid> 

+0

当你点击另一个图钉时,如何切换回初始状态? – Depechie 2013-05-23 08:16:56

0

@Depechie

private void RectangleTapAction(GestureEventArgs e) 
    { 
     var pushpinControl = TryFindParent<Pushpin>(e.OriginalSource as UIElement); 
     var pushpin = (pushpinControl as FrameworkElement).DataContext as PushPinModel; 

     Locations.Where(t => t.Id != pushpin.Id).ToList().ForEach(t => t.Visibility = Visibility.Collapsed); 
     pushpin.Visibility = pushpin.Visibility == Visibility.Visible ? Visibility.Collapsed : Visibility.Visible; 

     e.Handled = true; 

    } 

位置是一个ObservableCollection,有一个LINQ的,我隐藏其他图钉文本框。 PushPinModel具有表示可见性的属性。

1

@Rares发现了另一种解决方案,即工作在我的情况下,大...

所以这里的普遍问题就是,如何切换/敲击图钉时更改设计。 好吧,当你将图钉添加到地图时,他们从工具包中获得了他们的设计,但是你仍然可以通过在代码中设置样式来改变它!

所以,如果你挂钩每个图钉图钉水龙头事件中,你可以做你的代码下面的XAML页面的背后:

private void Pushpin_Tap(object sender, System.Windows.Input.GestureEventArgs e) 
{ 
    ((Pushpin)sender).Style = Application.Current.Resources["PushpinStyle"] as Style; 
} 

只要你创建一个具有图钉资源字典内PushpinStyle作为TargetType。

为了能够在推动另一个图钉时重置设计,我只是保持对按钮的引用按下并重置它的样式,然后再更改新按下的样式。

对我很好用...