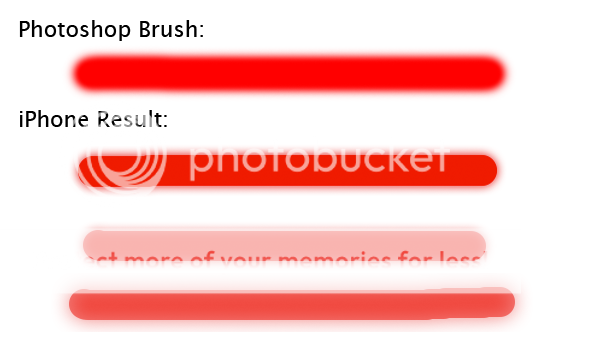
我一直对绘画与内发光的路径,并以某种方式成功(至少对我的口味)。
我实现了在levinunnick's Smooth-Line-View顶部的绘制代码。该代码是MIT许可的,因此您需要将其添加到您的项目中。
目前,您可以指定线的颜色,宽度和你想画线的平滑度。注意平滑度,使用0到1之间的浮点数。我更改了触摸方法,因为我需要从另一个视图访问绘图方法。如果您想恢复到触摸方式,请检查原始代码。
我没有优化代码,如果你有更好的主意,只需编辑这个答案。
这里是.h文件:
@interface LineView : UIView
- (instancetype)initWithFrame:(CGRect)frame andColor:(UIColor *)lineColor andWidth:(CGFloat)lineWidth andSmoothness:(CGFloat)lineSmooth;
- (void)touchStartedWith:(CGPoint)location;
- (void)touchMovedWith:(CGPoint)location;
@end
这是M档:
#import "LineView.h"

static const CGFloat kPointMinDistance = 0.05f;
static const CGFloat kPointMinDistanceSquared = kPointMinDistance * kPointMinDistance;

@interface LineView()
@property (strong) UIColor *lineColor;
@property (assign) CGFloat lineWidth;
@property (assign) CGFloat lineSmooth;

@property (assign) CGPoint currentPoint;
@property (assign) CGPoint previousPoint;
@property (assign) CGPoint previousPreviousPoint;
@end

@implementation LineView
{
@private
    CGMutablePathRef _path;
}

- (instancetype)initWithFrame:(CGRect)frame andColor:(UIColor *)lineColor andWidth:(CGFloat)lineWidth andSmoothness:(CGFloat)lineSmooth
{
    self = [super initWithFrame:frame];
    if (self) {
    _path = CGPathCreateMutable();

    if (lineSmooth < 0) lineSmooth = 0;
    if (lineSmooth > 1) lineSmooth = 1;

    self.backgroundColor = [UIColor clearColor];
    self.lineColor = lineColor;
    self.lineWidth = lineWidth;
    self.lineSmooth = lineWidth * (lineSmooth/4);
    self.opaque = NO;
    }
    return self;
}

- (void)drawRect:(CGRect)rect
{
    [self.backgroundColor set];
    UIRectFill(rect);

    @autoreleasepool {

    CGColorRef theColor = self.lineColor.CGColor;
    UIColor *theClearOpaque = [[UIColor whiteColor] colorWithAlphaComponent:1];

    CGContextRef context = UIGraphicsGetCurrentContext();
    CGContextAddPath(context, _path);
    CGContextSetLineCap(context, kCGLineCapRound);
    CGContextSetLineWidth(context, self.lineWidth);
    CGContextSetStrokeColorWithColor(context, theColor);

    // Outer shadow
    CGSize shadowOffset = CGSizeMake(0.1f, -0.1f);
    CGFloat shadowBlurRadius = self.lineSmooth;
    CGContextSetShadowWithColor(context, shadowOffset, shadowBlurRadius, theColor);

    CGContextStrokePath(context);

    if (self.lineSmooth > 0) {
     // Inner shadow
     CGRect bounds = CGPathGetBoundingBox(_path);
     CGRect drawBox = CGRectInset(bounds, -2.0f * self.lineWidth, -2.0f * self.lineWidth);

     CGContextSaveGState(context);
     UIRectClip(drawBox);
     CGContextSetShadowWithColor(context, CGSizeZero, 0, NULL);

     CGContextSetAlpha(context, CGColorGetAlpha(theClearOpaque.CGColor));
     CGContextBeginTransparencyLayer(context, NULL);
     {
     // Outer shadow
     UIColor *oShadow = [theClearOpaque colorWithAlphaComponent:1];
     CGContextSetShadowWithColor(context, CGSizeMake(0.1f, -0.1f), self.lineWidth/64 * self.lineSmooth, oShadow.CGColor);
     CGContextSetBlendMode(context, kCGBlendModeSourceOut);
     CGContextBeginTransparencyLayer(context, NULL);

     [oShadow setFill];

     // Draw the line again
     CGContextAddPath(context, _path);
     CGContextSetLineCap(context, kCGLineCapRound);
     CGContextSetLineWidth(context, self.lineWidth);
     CGContextSetStrokeColorWithColor(context, oShadow.CGColor);
     CGContextStrokePath(context);

     CGContextEndTransparencyLayer(context);
     }
     CGContextEndTransparencyLayer(context);
     CGContextRestoreGState(context);
    }
    }
}

- (void)touchStartedWith:(CGPoint)location
{
    self.previousPoint = location;
    self.previousPreviousPoint = location;
    self.currentPoint = location;

    [self touchMovedWith:location];
}

- (void)touchMovedWith:(CGPoint)location
{
    CGRect drawBox;

    @autoreleasepool {
    CGFloat dx = location.x - self.currentPoint.x;
    CGFloat dy = location.y - self.currentPoint.y;

    if ((dx * dx + dy * dy) < kPointMinDistanceSquared) {
     return;
    }

    self.previousPreviousPoint = self.previousPoint;
    self.previousPoint = self.currentPoint;
    self.currentPoint = location;

    CGPoint mid1 = midPoint(self.previousPoint, self.previousPreviousPoint);
    CGPoint mid2 = midPoint(self.currentPoint, self.previousPoint);

    CGMutablePathRef subpath = CGPathCreateMutable();
    CGPathMoveToPoint(subpath, NULL, mid1.x, mid1.y);
    CGPathAddQuadCurveToPoint(subpath, NULL, self.previousPoint.x, self.previousPoint.y, mid2.x, mid2.y);

    CGRect bounds = CGPathGetBoundingBox(subpath);
    drawBox = CGRectInset(bounds, -2.0f * self.lineWidth, -2.0f * self.lineWidth);

    CGPathAddPath(_path, NULL, subpath);
    CGPathRelease(subpath);
    }

    [self setNeedsDisplayInRect:drawBox];
}

- (void)dealloc
{
    CGPathRelease(_path);
    _path = NULL;
}
@end
 iOS Photoshop笔刷硬度像Photoshop一样

它看起来像你正在使用矩形?你会如何做到这一点中风? – ninjaneer 2014-08-09 00:17:09
@Ninja是的,它是矩形,你想在'touchesMoved'中画线并且有相同的影响吗? – mohacs 2014-08-09 00:57:46
我不知道这会如何影响性能,但如果它达到了中风路径的效果,那就没问题。 – ninjaneer 2014-08-09 00:59:02